I desperately needed to make a game. But how? I had no idea at that time. All I knew was that I had to create a game design portfolio because I wanted to work in the game industry more than anything else in my life. Like any other game designer wannabe on this planet I was bursting with ideas, which I “unfortunately” couldn’t turn into real games due to a lack of “technical skills”.
Then, one day, I came across an article of Mrs. Brenda Brathwaite, and this would change my whole approach to the issue. In her article Mrs. Brathwaite mentioned how important it was to just make a game. Any game. If you can’t make digital games, make board games. Make anything playable and add it to your portfolio.
Cool! I had found what I needed. “Ok boy” I said to myself, “you are making a board game right now.” So I started doodling and playing with ideas… But after a while I got stuck. Being a “casual writer” I was familiar with writer’s block. But how was I supposed to know that there was game designer’s block too!
It was again the phantastic Mrs. Brathwaite that came to my aid! And this time she deserves a header of her own.
The Great Advice of Mrs. Brenda Brathwaite
A few days later, when I again read through Mrs. Brathwaite’s blog (this is something that you should do too if you are into game design) I came across this great article with advice for those who suffer from “designer’s block”. Mrs. Brathwaite had a very simple suggestion to get things rolling again: to make a racing game. She also provided a ‘fool-proof’ step-by-step guide on how to make it. All I did was to follow her advice. I must admit that it worked wonders for me.
The 5 steps that Mrs. Brathwaite suggested were as follows:
1. Find something to race for: The love of your life, the World Cup, the Treasure Island, a date with Paris Hilton, the super-yummy-candy-coated-jellyfish-sandwich… anything that you deem worth racing for.
2. Wrap the race into a simple story setting (if applicable)
3. Find ways that help players to advance faster
4. Find ways to retard players advancement
5. Find ways in which they can ‘inflict’ the things in 4 (and maybe other things) onto each other. Also see if you can provide them with ways that allow them to cooperate in order to achieve the things in 3 (and maybe other things).
Then build the board, get some tokens, and give ‘em the dice… Here you go.
Simple, isn’t it? I thought so too and right off jumped into it.
The result was…
Windsurf Frenzy, the coolest game eva!
To be honest, Mrs. Brathwaite’s advice deserved a much better game idea in response, but I had to start somewhere. So I started with the most uncomplicated idea I managed to come up with: A windsurf racing game around a tropical island. Four rounds; the winner takes it all. Since this was already the story, there was nothing more to wrap around it. I didn’t want anything more because my ultimate goal was to finish the game (this is the best advice you can get on game design: finish your games!).
I made some calculations and decided that the game was going to be played with a 1d6 and I envisioned one round around the island to be between 40-60 squares.
Now it was time for the trickier parts: How to “reward or retard” the players. Thanks god, ideas were plenty. Just searching the internet for sea creatures or watching National Geographic TV gives you a ton of ideas about what could players help to advance further or cause them to wait: Winds, streams, crocodiles, mermaids, sharks and what not. It was also during this time that Poseidon appeared for the first time as a potential factor in the game. However he was in a minor role yet and it would take some time until he’d make it into the title of the game.
When it came to what players can do to each other, I had this idea of players being able to manipulate the winds and cause other players to go off track, which would make them wait for a turn or two. I wanted this to be the event of the game, something that everyone loves to do, but fears like hell when someone else is allowed to do it. In other words, I saw this mechanic as the hook, the central “fun factor” of the game. Basically, this game feature put a lucky player into the role of a “storm raiser”. The player who is the storm raiser would use a wheel like in the TV show “Wheel of Fortune” to decide other player’s destinies. The wheel would indicate the direction and strength of the storm that has been raised. And then we would see the other players perish as the storm drives them into cliffs, the open seas or the tentacles of giant octopuses. It sounded fun! I believed to have nailed down the star feature of the game.
Actually no one was there to warn me that I had already stepped beyond the borders of simplicity.
Board Design: Movement, Mechanics and Tessellation
Every time you design a board you learn a great lesson. “What’s there to learn from making a board?” you say, “just draw the squares”. Well ok, just do it then and see for yourself how it might not work as you thought it would.
It requires experience to select the most suitable tessellation for the mechanics and dynamics that will govern the overall gameplay experience. I had really a hard time to figure the impact of the “stormraiser” and how it would cause tokens and the board to interact. Maybe I didn’t think hard enough, but at the end it turned out to be not a very feasible idea, because the tessellation structures I tried out didn’t solve things the way I hoped they would. The solutions I found remained too complicated and always required human adjustment. In short I couldn’t make it work as a self-governed and “universal” process. Even in the smoothest of all solutions some sort of exception handling couldn’t be avoided and I simply didn’t want to harm the flow of the game with pauses for adjustment and calculation: So, with a broken heart, I had to drop the star of my show, the “stormraiser”. Sniff!
Sniff, yeah, but shedding a few tears now is still better than crying for the rest of the development process. I did myself a big favor with being able to say goodbye to my beloved stormraiser feature.
Indeed it is one of the most important things in design to know to let go (some say that this is true for love too). I remember that this has been always a problem for most of the people I met in my life: they simply couldn’t say goodbye to a “cool” feature. When I was doing my bachelor’s degree in film studies, I had the chance to work on a student film project with an aspiring director. We had the story scripted and went for the shooting. It went all good and finally we sat in the editing room and put the film together. But we never managed to make the movie as striking as we had hoped. What were the reasons for our failure? One of them definitely was that we couldn’t dare to cut off some of the rather irrelevant shots because they were “so beautiful”. But actually they created noise when it came to the clarity and overall impact of the film. They were visually stunning, but thematically dull and empty; they caused stagnation, they disturbed the pace that we aimed to create. Had we managed to drop the “star” scenes of our little student flick, we would have done much better.
The lesson to be learned: Don’t be afraid to cut off features. Don’t look back and continue to walk towards your goal. One day will come and there will be a much better chance to use the “star” idea you once left behind with a sad heart.
From Windsurf Frenzy to Poseidon’s Wrath
It’s funny how dropping the stormraiser idea opened the way to get it back into the game. I could think clearer without this feature and experimented on simpler ideas. And snap! The sharp turn in the process came when a different “story wrapper” hooked up with a simpler board tessellation style: Within a few minutes, Poseidon’s Wrath was born. And to my surprise, I was able to use the “stormraiser” feature without any problems now. Remember the famous quote from Dilampedusa’s The Leopard: “Sometimes you need to change everything in order to make things remain the same!”
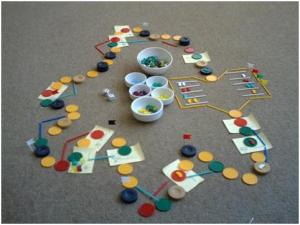
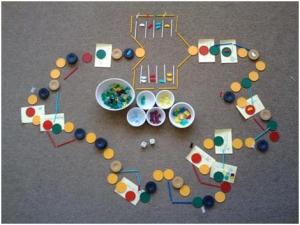
One of the earlier mock-ups of Poseidon’s Wrath. Casino chips and plastic sticks proved to be useful for flexible prototyping and playtesting.
I was happy, because my star from Windsurf Frenzy had not just reincarnated but was also reborn as a “higher” being than it used to be in its former life. Exactly like the theory about reincarnation would suggest. The storm raising idea was now refined and didn’t need any human adjustment. It worked in all situations (it was “universal”) and it had a big name to wrap it into: Poseidon, mighty ruler of the seas!
Most of the material I came up for Windsurf Frenzy could be “ported” to Poseidon’s Wrath with ease: Mermaids, sharks, winds, streams… they all fit well into the “new” story wrapper. Without getting too much into paperwork, I sat down and made a quick mock-up of the game. I used casino chips (in a variety of colors) to lay out a row of squares that players could move along and used the numbered tokens of a lotto game set for random event generation. Next to me I kept a list of rules and a list of numbered random events so that I could easily look up what had “happened” when I had drawn a lotto number.
And MUCH MORE important: I wasn’t only thinking about the game anymore. I was playing it. And you re-think them all when you start to really play (with) your “thoughts”.
No doubt: The design process had entered a new stage.
Step 2: Nailing Down the Formal Design
Before I get into the details of this step, I just want to say that I cannot emphasize enough the importance of prototyping and playtesting. It’s even more rewarding to you when you know what you are after or what feature you want to test in particular. This is something that settles by itself as you iterate through the testing sessions. You will narrow down your test goals as thing get clear.
From Doodling to Structure
My initial playtesting sessions were similar to doodling with pen and paper. I had a preliminary set of rules and tokens and took them to simulate games between four imaginary players (Later I would write down an AI for them: basic characteristics of their behavior such as “killer”, “buyer”, “negotiator” etc to see how the game would “react” to different playing styles). The game was not yet fully functional and important parts weren’t even decided yet, but I saw playtesting as exactly the chance to find answers and solutions to the “yet-to-be-decided”. As I rolled the dice and put my virtual players through the game, I spotted mistakes, saw how some of my “perfect ideas” were totally useless when it comes to “real” play, and got familiar with the “feel“ of my game (in contrast to think about how it would feel). This helped me a lot to make my mind up about what I wanted the game to really feel like. And most important: None of these things I could have solved and cleared by only thinking and writing about my game idea.
Another advantage of prototyping: Even if I sometimes couldn’t understand the reasons behind it yet, I got an initial idea about the balance problems in the game. For instance I would see that any player who managed to utilize the stormraiser feature once, would clearly win the game, because the damage was too severe and a player once struck by it was unable to recover in the remaining rounds. But after all, a game needs to maintain the feel that it is still winnable regardless of how hopeless the situation is, so I had to make some serious changes to the stormraiser feature. By the way, the work on getting the stormraiser thing right was a great way to understand why we were bothered with Mathematics back in the good ole school days. Sometimes a small formula and some calculations worked wonders.
Also playtesting gave me a great understanding about the importance of event density in a game: I felt that the game in general had a level of event-density that bordered at the “chaotic” and I had to take the game features under control if I wanted to foster a unified, structured experience with a clearly distinguishable, unique and tasty flavor. I had to distill the mechanics and needed to mold them with a careful sense of proportion in order to create the experience that I wanted players to take with them. This process showed to me that fun and challenge doesn’t come when you randomly throw with events at the player, but when you manage to channel her through a well-balanced row of interesting events. A feeling of progress and growth was central to a good game experience. But that’s easier said than done: it requires pacing, timing, and a sense for magnitude and density. More than that: it requires empathy. You have to ignore yourself completely and must focus on what the player would feel at that very moment, on that very square, as she now faces Y, after coming from X, and seeing Z ahead. If you want people to enjoy this, you better care about what you send them through.
My initial doodling changed within time and turned into a more structured picture. I had now identified my basic building blocks and took them as the components to create interesting play sequences. I used the colored chips and experimented with a variety of layouts. I cannot stress enough how much time the casino chips saved for me. Normally I would have spent long times to draw and print the various paper versions. But by using the chips, I could modify the layout in real-time, and see how the situation had been with a different lay out. What I did was to take photos of all layout versions, so that I could follow up the change. These photos were added to the files that I kept about the individual playtesting iterations.
Building Blocks and Formal Design
After one of those long nights of playtesting I finally went to bed and slept the deepest of sleeps. I don’ exactly remember how and why, but I woke up with a sentence in my mind. With half-closed eyes I found pen-and-paper, wrote the sentence down, and fell immediately asleep again. When I got up around noon, I read what I had written down:
“Nowhere in a game can you find more determinism than in moments in which the designer has utilized a random event generator. A chance card indicates it’s opposite! That is, the chances of things to happen have been limited to what the designer wants to see happening.”
This little message to myself would change my approach to design. I realized that game design was about arranging the “chance” of things to happen so that people can enjoy their failures. And I liked to be in such an evil-sweet role!
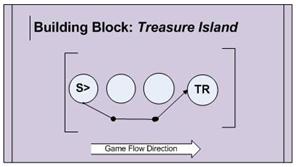
I started to arrange a variety of “building blocks”. These were little arrangements to let the player glide into an event and confront him with a mechanic or dynamic. Building Blocks were aiming at specific things to happen, something that the player would regard as interesting (like a choice) or important (a great improvement or a big blow to his status). The player would either land directly on the square that triggers the event, or, he would move onto a square that by default moves him onto a square that is very likely to trigger the event (such as a chance card square for example).
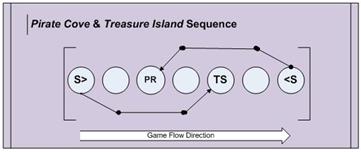
My experimentation with building blocks matured. I tried to connect these blocks in a variety of ways to create “sequences”. Sequences basically were intertwined building blocks that together created a more sophisticated and complex structure than a single building block. The challenge in here was to construct sequences that were adventurous yet balanced. If building blocks were thrown together without care, then the result would usually be a little chaos that gets players stuck, or worse, turns them into helpless little losers. Finding the ideal way to connect these building blocks was a matter of making them click in the right way: The moment of clicking could be felt and was usually like as if you’ve solved a wooden puzzle. After some serious work, I managed to create the sequences that I believed to be the most balanced but action-loaded ones.
By using the two building blocks “Pirate Cove” and “Treasure Island” I created this play sequence. This example is only one out of many possible combinations. Here the “unlucky” player receives a severe blow, while the “lucky” player will definitely enjoy the moment. However, just a turn later the roles could be reversed for both players. As you leave the treasure island, all the sudden a stream carries you to the pirates and you lose all that you won! Or, sad that the pirates took all your diamonds, suddenly you receive the compensation for it at the treasure island.
Articulation of Play Sequences
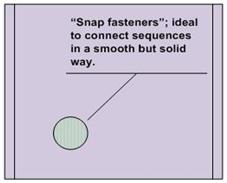
Now one task remained: To connect the sequences without disturbing the rhythm and pace and without causing the balance of the individual sequences to collapse. To achieve this, I revised the sequences and arranged them in such a way that at the beginning and end of each sequence a few squares would remain. I called these squares the “snap fasteners”. You could snap the sequences together without destroying their individual balance, plus maintaining smooth transition. The players were moving from one sequence into another without even noticing it. The game flow became flawless.
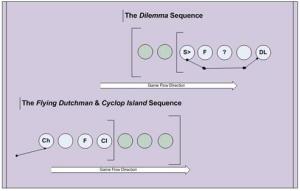
Many of the sequences (like the Song of Sirens sequence above) would utilize chance cards (Ch). A chance card spot however has a certain impact range (indicated with brackets in the graphic illustrations). In the light of my 1d6 based movement-mechanic and the set of possible events in the card deck that the player draws from; a player might be sent anywhere within a range of 12 squares. In this design the chance card deck had many “advance/go back 2 squares” and “move three squares back/forth” cards. Also a high possibility was that you would be sent back to the previous fortress (F) or forward to the next one. Therefore, the active range in most of the sequences would be the four squares before and after the chance card spot (eight squares in total). This meant that at the start and end of most of the sequences there were “unused” squares that were ideal to connect the sequences in a “seamless” way. I decided to call these squares “snap fasteners”, because that’s what they kind of look like.
Needless to say that it’s up to us to shorten or lengthen the transition period between sequences.This is in first stance a matter of rhythm and pacing. In the above example I rather have a “manifest” transition
with a “clean streak” of three squares before the next sequence. This gives the player a moment for taking a breath. In the examples below you can see how tight knit it can get if we want to pace up things. However, the tighter knit the sequences are, the higher will be the event density. Too high density levels for long periods of the game will create a chaotic feel and the player will lose his ability to see his goals clearly.
Failure that Entertains
Once I had all sequences snapped, I tied together both ends of this huge piece of “seamless” events at the starting point of the game, the “Harbor”. Now I had a game loop, something that I could use to send the players through over and over again.
The result was satisfying: Every event was calculated but to the player it still felt like fate when these calculated things happened to him. Gameplay was was full of twists and shocks, but still a fluid experience with zero frustration. Even when the pressure piled up, the player still didn’t lose sight of his ultimate goal: to get all ships into the harbor and win the game! And even if a player would fail, he would still feel joy and entertainment.
Reward Structures, Interesting Choices and Motivation
One of the key moments of the game was when I decided which behavioral patterns I wanted the players to adopt during play. In each general and individual turn of the game (regardless of whom turn it is) I wanted each of the players to see at least one of the following (but the more of them, the better):
• An interesting choice between a long term investment and a short-term advantage
• A reward surrounded by something that bears risk for failure as we go for that reward
• The chance to interact with another player (in both senses acting upon her or being acted upon by her)
• The big goal of the game
• The possibility to win this game
Once you know what you want to give, it’s easier for you to work on your goal. I spent a lot of work and thinking on creating a game flow that gave the player as many of these, at any point in the game. A seamless flow, challenging but not hopeless: that was what I was aiming for.
I checked all building blocks and sequences also in regard to motivation and was happy with the result.
Now I had to check one last thing…
Greater Game Structure
One thing I did was to divide the total number of squares into four and considered each “quarter” as one “curtain” of the game.
The first 10-15 squares were the “Intro”. Here, my goal was to establish the player vocabulary. The first turn in the game would be used to teach the players about the basic events in the game: The first 4 to 6 dice throws should introduce the basic “verbs” of the games and the “objects” that they are applied to: advancing, going back, drawing a chance card, paying or receiving diamonds, buying a fortress, paying a fee of passage to a fortress owner etc. I put a lot of effort into arranging the first 7-9 squares to be as “loaded” with events as possible. I avoided too big rewards or too harsh punishments in this section of the game. This was actually a mini-tutorial, but didn’t feel like a tutorial because the player was gradually but in a determined way lured into the game world.
The last 10-15 squares were – of course- used to create turmoil and upset the leading players. This was the “climax of the turn and presented the by far worst obstacle, the Island of the Cyclopes: Once caught in it, one had to throw a six to escape it and if not, it meant that the player continued to be stuck and was losing one diamond per turn: exactly like Odysseus who lost one of his soldiers for each day he couldn’t manage to escape the Cyclops. In order to make it not too frustrating for the “locked” player, I decided to allow him two attempts per turn to throw a six.
The “middle” parts of the game consisted of two chunks of 10-15 squares, together making the bulk of the game: 20-30 squares. Each half of the middle had a central theme, which was of course one of the “sequences” I had already prepared. In each of the halves I placed the Poseidon Temples that allowed players to bemoan Poseidon to send his wrath onto the rival players. It meant that the chasing pack had two chances to pull the leader back as he was approaching the harbor. It was quite bloody at times and the leader could lose his advantage quickly. It happened more than once that two or more players were involved in a final sprint to hit the finish line.
A little update would be appropriate at this point of the article. At the end it turned out that I had more than 60 squares: 73 in total. That is a lot for a board game. But then, every square in it was justified. How do I know you will ask? Well, I had this strange thought that it should be 72 or 74 squares. 73 sound so… I don’t know, I want 72 or 74, right? To find a solution to my “problem” I first looked to remove one of the squares. But it wasn’t possible. I checked square by square but every single one of them was connected to the whole in a way in which the removal of even a single square would have caused chaos. Building blocks that weren’t supposed to do so would suddenly intertwine and as a result the game would show behavior that I did not plan for. (This is a good thing sometimes, but not in this case). Then I thought, ok I can’t remove anything, but why not adding something? Again it didn’t work for the same reason. Adding one square made the order of things slid. So there I stood, not knowing what to do. There was this stupid 73 and I couldn’t do anything about it. But on the other hand it showed how well and tight-knit the overall design of the game was. Cool!
A round-up on Step 2: As you see, this stage of the developing process involves an insane amount of logical thinking, abstraction, construction, prototyping, playtesting, balancing, and evaluation. As difficult as it is as a process, it is definitely the period in game development that teaches you the most about game design.
All in all, after Step 2 my game felt very organized. I believed to have done a great job and of course didn’t miss the chance to take a picture of this moment!
This series will continue with an article on Steps 3 and 4 respectively, so stay tuned!
Did you find this article useful? Please leave a comment and share your tought with us.






[…] My latest feature… Posted on September 3, 2008 by altug isigan My latest feature, an article on the design process of my game Poseidon’s Wrath is out. Please check the article out here. […]